
Custom Tools in ArcGIS Pro – An Alternative to the Multiple Ring Buffer Tool
Various skills and tasks in terms of coding and the use of ArcGIS Pro can be enhanced through a GIS Programming course taught by Dr. Darren Scott. An assignment that caught my attention and would like to share in this article is about the use of custom tools in ArcGIS. Custom tools can be used to extend the ArcGIS Pro suite with new functionality, and can be an alternative way to enable user input. With custom script tools in ArcGIS, regular Python scripts can be converted into geoprocessing tools that are very similar to the system tools found within the toolbox in ArcGIS Pro. This enables a user interface to be created, allowing users to work with the extended functionality provided by custom tools.
With the use of a Python IDE (Integrated Development Environment) such as PyCharm, a custom Python script can be developed, then configured as an ArcGIS script tool and shared with users who do not need knowledge of Python to use the tool in an ArcGIS Pro project. The task for this assignment was to create an alternative to the Multiple Ring Buffer tool in ArcGIS Pro that offers an approach for creating buffers around features. When using this tool, a user may specify multiple buffer values, which must be entered individually as separate values input. This can be tedious for a user if many values need to be entered. The result of the process is created as a set of rings around a central buffer area stored as features in a single feature class, which might not be optimal for automation of certain workflows. Therefore, the task for the assignment is to develop an alternative that simplifies both the input and output.
Steps taken to create the Custom Tool
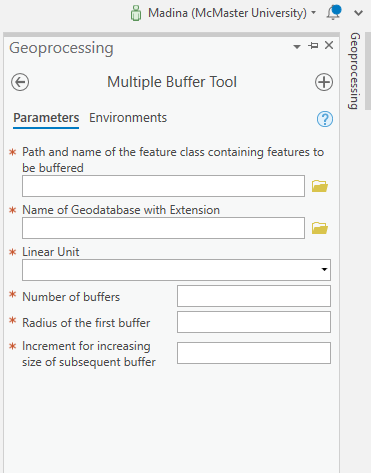
The first step in the Python script is to import the ArcPy site package. This allows the use of ArcGIS geoprocessing tools, functions, classes and modules. Next, a function is created in the script to generate a series of buffers around input features stored in a feature class. The sample input data used for this assignment was a point feature class called “Educational_Institutions”. Parameters for executing the tool are initialized as variables by prompting the user for input interactively using the input() method in Python. Any parameters that need to be represented as integers values should be cast to the int data type since the input() method returns string values. The prompts in the script must ask the user for the following information in order to be able to execute the multiple buffer tool:
- The path and name of the feature class containing the features to be buffered
- The path and name of the geodatabase for storing the output
- The linear unit for buffering (only meters or feet)
- The number of buffers to be created
- The radius of the first buffer
- The increment for increasing the size of each subsequent buffer
The function proceeds by setting the workspace environment variable for ArcPy, which affects how the tool runs. The workspace can be set to a folder or a geodatabase, and will be the default location that stores input and output feature classes when the script is run. For this assignment, the workspace environment is a file geodatabase that already exists. Therefore, no extra code is needed to handle creating the workspace. However, some extra steps to check that the workspace exists is ideal. Once these steps are complete, the remainder of the function will overwrite any previous outputs in the workspace (by enabling the overwriteOutput environment setting for ArcPy).
Next, all the different sized buffers based on the chosen input parameters for distance, number of buffers to create, and radius of the starting buffer are used to derive a list of values representing each buffer distance that the tool needs to calculate. A for loop can then iterate over this list of values. For each distance, an output path for a buffer feature class is defined based on the path of the original feature class with the corresponding buffer size appended as a suffix (e.g., Educational_Institutions_2). Within each iteration, all of the required input variables are passed to the Buffer (Analysis) function. After the loop is completed, multiple unique buffer feature classes will have been created in the current workspace.
When the script is ready to be used as a geoprocessing tool in ArcGIS, the script must be edited to replace any interactive or hardcoded input parameters with functions that obtain values from ArcPy parameters, which will be passed to the script from a script tool in an ArcGIS toolbox. This can be accomplished by executing variable_name = arcpy.GetParameterAsText(<index>) and/or variable_name = arcpy.GetParameter(<index>). GetParameterAsText obtains a string representation of a script tool’s parameter’s value. GetParameter will return parameter objects, allowing raw values to be accessed (e.g., for integers). The variable names set for the results of these functions may be passed throughout the script’s code. It’s important to keep in mind that the index of a given parameter when these functions are called must correspond with the order of parameters defined in the configuration of a script tool in an ArcGIS toolbox.
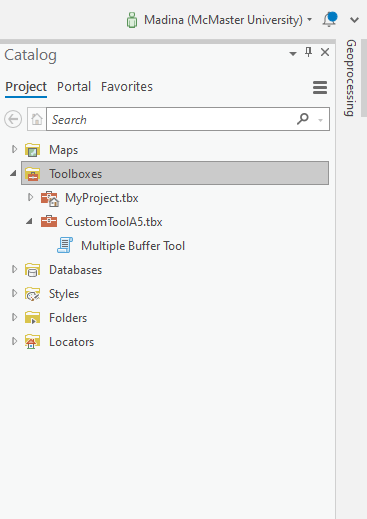
As a way to communicate the progress of a task, messages can be added to the geoprocessing output from the script, informing the user what is taking place as the tool is being executed. This is done by executing arcpy.AddMessage('<message>') at appropriate times in the code, with an appropriate text value for the message. For this assignment, message is displayed as each iteration of the for loop is completed, which is visible through the ArcGIS geoprocessing interface (shown later in Figure 4). After the script has been configured to be used as a script tool, it needs to be added and configured in an ArcGIS toolbox. In a project for the assignment, a new toolbox was created in ArcGIS Pro called CustomToolA5. The new script tool was added in this toolbox, and configured to execute the script file that contained the function described above.
When the new script tool is created in the toolbox, properties of the tool need to be established through the General and Parameters panel.
1. General includes the Name, Label, and Script File (the location of the script file on disk) for the tool.
2. In the Parameters panel, each of the parameters that are accessed in the script using the GetParameterAsText or GetParameter methods must be defined in sequential order relative to the index used to retrieve each parameter in the tool’s Python code. For each parameter, the following must be defined:
- An informative Label and a Name for each parameter must be specified. The Data Type must be set to define what value the user should provide (e.g., Folder, String, Long).
- The parameter Type specifies whether the parameter is required or optional.
- The Direction identifies whether the parameter is required as Input or Output. Most of the parameters are set as input. Output parameters are needed if, for example, resulting datasets need to be written to a specific path, or if output values need to be accessed by other tools or scripts.
- If an input parameter may only accept certain values, then a Value List can be specified for its Filter property to define permissible values (e.g., linear units, arrow units). These values will be presented in a list of options that can be chosen by the user for the corresponding parameter when executing the custom geoprocessing tool.
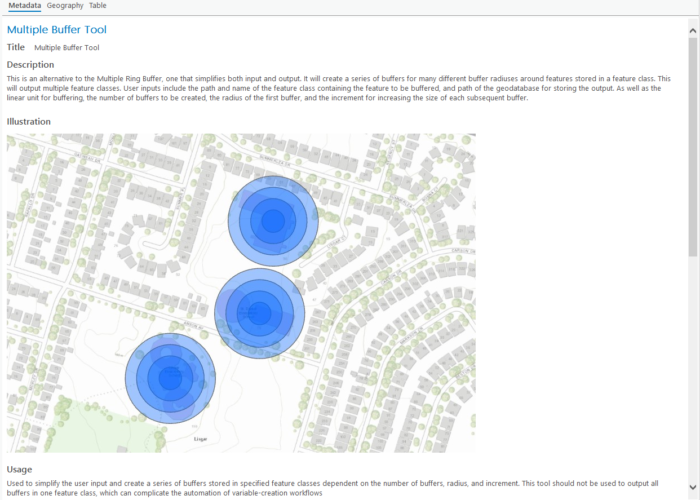
Once all the parameters and the general properties are established, Metadata should be created for the geoprocessing tool. This provides documentation for users to understand the tool’s functionality and how to use it (Figure 3).
Once completed, you may want to share a Custom tool to project partners or other users. The best way to share the tool is as a series of folders (Script, Documentation, Tool, Data) that contain all of the required content for the custom script tool, and help make it easier for a user to navigate and incorporate the tool into their ArcGIS Pro project. The folders are all stored within a single parent folder, which may be packaged in a zip archive and shared.
Example usage of the custom Multiple Ring Buffer Tool
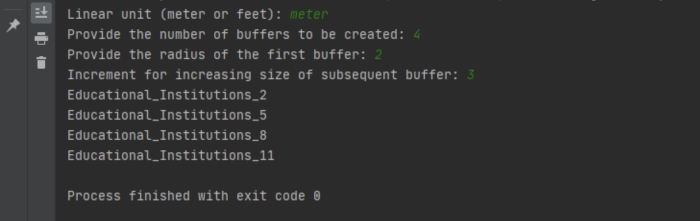
After the first version of the script tool for this assignment was completed, it was tested first by running it as a regular Python script and entering the required input parameters with each input prompt. The basename of the input feature class in the specified geodatabase was used as the name for output buffer features at each interval, with the buffer distance appended to the name, and written to the specified geodatabase for storing output. The linear unit was set to meters, with four buffers created, starting with a 2-meter buffer and each subsequent buffer incremented by 3 meters. The execution of this test through the Python console is shown in Figure 4, with the prompts for input parameters followed by the printed messages at the completion of each loop iteration (showing buffers created for distances of 2m, 5m, 8m, and 11m).
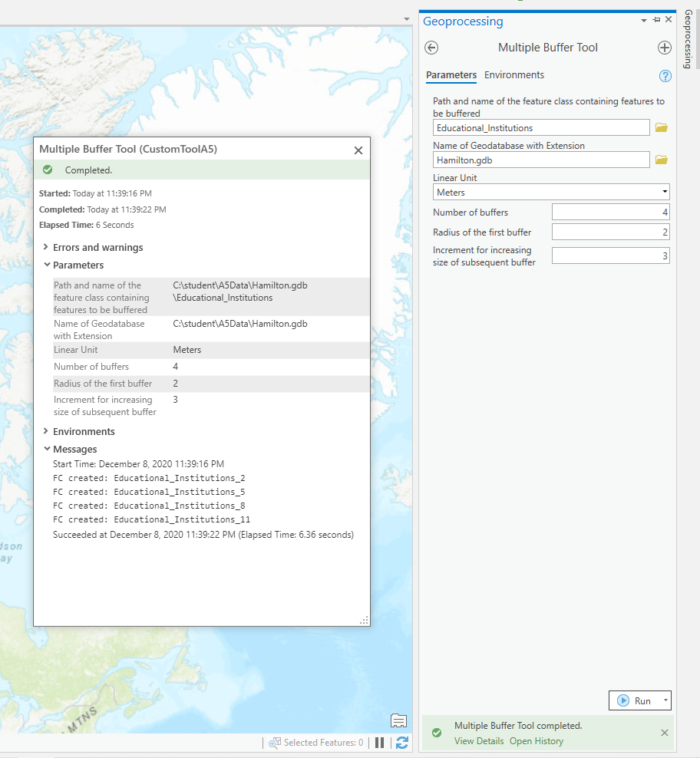
The same input parameters were used to execute the version of this tool configured as a script tool in ArcGIS Pro. In Figure 5 you can see the input parameters (on the right), and the output messages and successful state of the tool’s execution in the ArcGIS Pro geoprocessing task details (left).
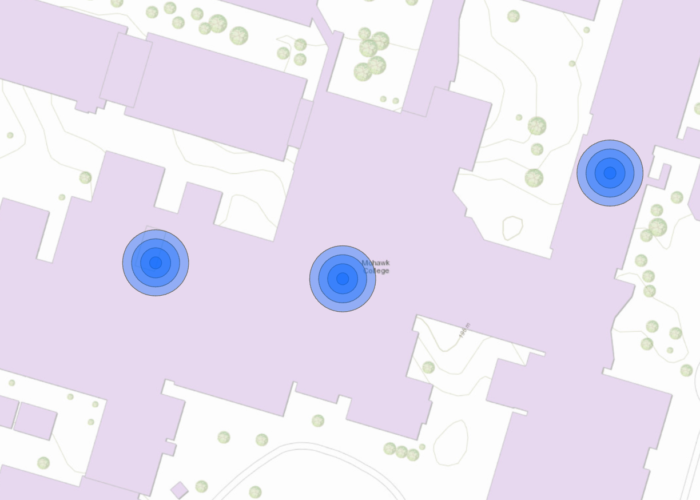
To visually analyze the results, the output buffer feature classes can be added to a map in ArcGIS Pro. Figures 6 and 7, for example, show the results of the same input parameters for different measurement units (Meters vs. Feet). Additional units (e.g., those listed in the Multiple Ring Buffer tool) could be included in the value list for the linear unit parameter to accommodate different preferences for measurements.

Understanding the fundamentals of Python and knowledge of using ArcPy and a Python Interpreter are useful to enhance creativity and efficiency. Converting scripts into custom geoprocessing tools, can further aid with the incorporation of new methods and functionality into unique tasks and workflows in ArcGIS. Script tools can also be an effective way to share complicated custom processes with other ArcGIS applications and users who do not need to know how to use Python directly.