
A Glance at Enterprise Geodatabases and Publishing Content
Introduction
All of us in the field of GIS already know what a geodatabase is. Most of us know how to properly create one, especially for single-use or for our own personal projects. Depending on the GIS project, most of the time academic institutions just need personal or file geodatabases. For industry and government, it can be a different world. This is because they have large amounts of geospatial data (sometimes “big data”) for different purposes across sister teams to achieve different objectives. A database that fulfills these characteristics would be known as an enterprise geodatabase. The purpose of this blog is to introduce the capabilities of an enterprise geodatabase, how to create one, and how to access, modify, and publish to your Portal using the combination of ArcPy and the ArcGIS API for Python.
Capabilities of an Enterprise Geodatabase
Before delving into Enterprise Geodatabase, please keep in mind that this topic may not be as compelling as CityEngine due to its context. Nonetheless, it is very important to know the difference and is meant for those that will likely work for an employer that scales up towards production. The capabilities of enterprise geodatabase are the following:
- Scalability
- Accessibility
- Storage
- Storage formatting
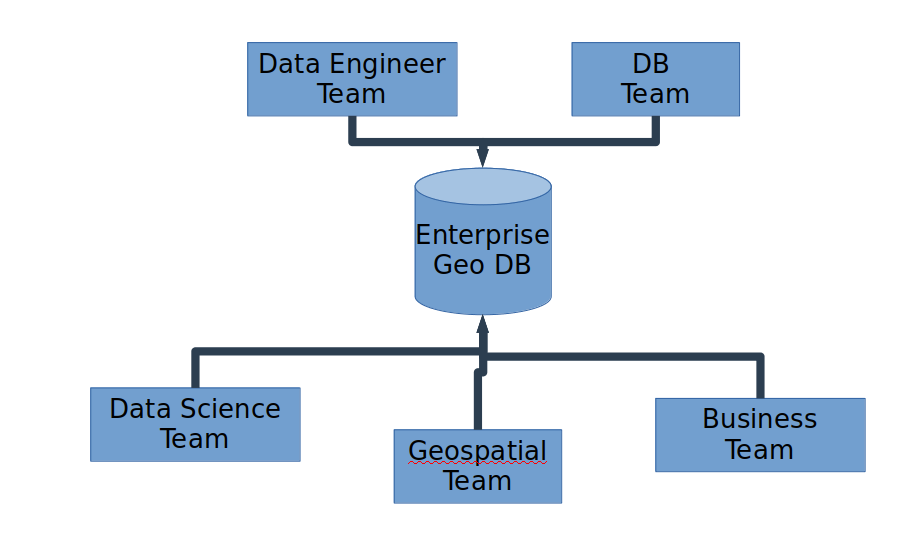
Scalability is a relative term and ultimately depends on who are the clients or stakeholders involved. For instance, a transportation project in collaboration with the city would entail transport engineers and city officials to work on the same enterprise geodatabase without overwhelming the hosted server. Accessibility is the key for sister teams and clients to have direct access to the enterprise geodatabase securely. Sister teams in the technical sphere may consist of database, geospatial, data scientists and engineers, and business. Such a project group would perform their own tasks whilst communicating amongst other teams to meet their objectives. The database team would develop and maintain the database management system (DBMS), and provide credentials to their sister teams. Geospatial teams perform geospatial analyses, edit and modify geospatial data, and convert to tabular format for the data scientists and engineers. Data engineers clean, munge, identify the difference between structure and unstructured data, and build the data architecture and infrastructure. Their position may overlap as a database developer. Data scientists mine into the raw data (mainly tabular) and produce interpretive results. Business analysts work with the clients to define their business needs based on data models, written requirements, and processed diagrams and wireframes. A diagram below presents what a group project may look like with the use of an enterprise geodatabase. The diagram can be more complex with arrows pointing between sister teams.
As for storage, an enterprise geodatabase is meant to store large amounts of geospatial data. This would refer to “big data” when the amount of storage space required exceeds that of a standard computer. In this context, storage can be tied back to scalability. Lastly, storage formatting in the enterprise geodatabase has more flexibility than the file and personal geodatabase. They can be created in a DBMS, such as Microsoft SQL Server, Oracle, IBM DB2, IMB Informix, or PostgreSQL. ArcGIS has ArcSDE (spatial database engine) that bridges ArcGIS products and one of the aforementioned DBMS; thus, enabling users to utilize the data at ease. More documentation of the differences between enterprise geodatabase and file / personal geodatabase can be found here.
How to Create One
The difficulty level of creating an enterprise geodatabase is based on your knowledge and type of DBMS you are using. If you have DB developers, it is not mandatory to know DBMS; however, knowing the bare minimum concepts of a DBMS is recommended. For Microsoft SQL Server, we would have to do the following:
- Download the Microsoft SQL Server Express and install it on your Windows machine.
- The DB developer or yourself would have to create a new SQL DB instance. This is where ArcGIS will connect and create the Enterprise Geodatabase.
- Open ArcGIS Pro/ArcMap and search for the geoprocessing tool, “Create Enterprise Geodatabase.” The parameters will ask you to fill in the following: a) DBMS platform (i.e., SQL Server); b) the name of the instance (if applicable, add a comma after the instance name with the port number); c) create a name of the database; d) authorization credentials, and; e) SDE owned schema.
That’s it! It may take some time to create the enterprise geodatabase. Additional documentation of this process can be found here.
Accessing, Extracting, and Publishing Data to Your Portal
This section assumes you already have access credentials to your DBMS and have developed an Enterprise Geodatabase within it. There are several ways to access geospatial data from the enterprise geodatabase. The easiest way is to use the GUI in ArcGIS Pro or ArcMap (and/or ArcCatalog), where you can connect to a database and provide authorization credentials. Once, connected, the process of importing and exporting geospatial data is treated the same as a file/personal geodatabase. With ArcGIS Pro, you can easily publish content directly to your Portal. Those that don’t have ArcGIS Pro would have to login the Portal page and upload contents to be published through there.
The developer approach is to utilize the ArcPy and the ArcGIS API for Python. This is particularly practical when constantly updating and/or handling large amounts of data, and maintaining the enterprise geodatabase; thus, automating the entire process. Below is pseudo-code in how to access, modify the enterprise geodatabase, and publish to your Portal. For this context, the enterprise geodatabase has been built within Microsoft SQL Server.
-
- In Windows, go to Start -> All Programs -> ArcGIS Pro -> Python.exe (run as virtualenv). If you don’t have ArcGIS Pro, you may have to execute in two separate Python environments, as ArcPy works in Python 2.x and the ArcGIS API for Python works in Python 3.x.
- Type in the uploaded terminal, “jupyter notebook”. Jupyter Notebook is fantastic to debug, test, and display the graphical components of the Portal on the fly.
from arcgis import GIS
from getpass import getpass

# Set the env workspace - in this case the SDE file
arcpy.env.workspace = r'C:\Users\AppData\Roaming\Esri\Desktop10.5\ArcCatalog\enterprise_db.sde'

# List all available feature datasets and feature classes
fcData = arcpy.ListDatasets("*", "Feature")
fcList = arcpy.listFeatureClasses()

print(fcData)
print(len(fcList))

# Print all the feature classes
for fc in fcList:
print(fc)

# Feature properties for hosted feature layer (publish to portal)
feature_test_properties = {
    'title':'Testing SQL to Portal (Roads)',
    'description':'Testing purposes',
    'tags':'arcgis, python, sql, roads'
}

# Copy over from SQL database to temporary geodatabase / shapefile (purge later)
arcpy.CopyFeatures_management(fcList[1], r'C:\Users\Roads')

#Zip the shapefile

# Enter username and password credentials without disclosing info
username = getpass('Enter username: ')
password = getpass('Enter password: ')
gis = GIS('https://myarcgisonline.ca/portal', username, password)

# Start publishing the content to the portal
sql_roads = gis.content.add(
    item_properties = feature_test_properties,
    data = r'C:\Users\Roads\Roads.zip'
)
sql_roads

# Publish it
published_service = sql_roads.publish()
display(publish_service)
While this is relatively a simple way of accessing, modifying, and publishing content from an enterprise geodatabase to hosted feature layers in Portal, it certainly gives the idea of what you can really do with this. The ArcGIS API for Python and ArcPy have some similar functions; however, I recommend delving into the documentation of the API to notify the differences. It is a powerful API to perform analyses within the WebGIS sphere and administer ArcGIS Online / Portal systems.