
Using GitHub Desktop to Share and Collaboratively Develop Experience Builder Widgets

In this short post, I am going to extend my earlier tutorial on ArcGIS Experience Builder Dev Edition by showing you how to use GitHub Desktop to share and collaboratively develop your Experience Builder widgets.
Why use GitHub
GitHub allows you to upload copies of your codebase online in repositories. These repositories provide a backup for your code, in case something happens to your local machine, and also track your changes, allowing you to revert back to an earlier version of your code if things go south. Further, GitHub allows you to share these repositories with specific individuals or the public, allowing you to work with others to develop your Experience Builder widgets (or any other program), and make your code available for others to use and improve upon once you are done with it.
Why use GitHub Desktop
GitHub Desktop allows you to create local repositories and upload them to GitHub Online without using the command line. It also provides a very intuitive interface for tracking changes in your code. All in all, GitHub Desktop makes the version control, backup, and sharing capabilities of GitHub accessible to a broader group of users.
Setting up GitHub Online and GitHub Desktop
Before you create your first repository, you will need to follow these steps to get set up with GitHub:
- Create a new GitHub online account by following the steps here.
- Install GitHub Desktop here.
- Log into GitHub Desktop using your GitHub Online credentials by following the steps here.
Creating your First Repository
Now that you have set up GitHub online and on your local machine, you can now create a repository for one of your widgets. Doing this is quite simple:
- Click on “Current Repository>Add>Create New Repository”, as shown below:
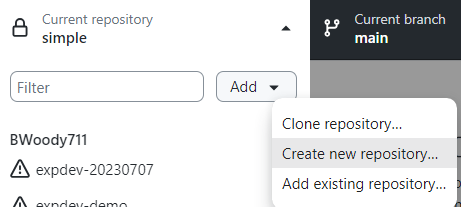
- For your “Local Path”, copy the path on your filesystem that leads to your Widget into this field. Do NOT include the name of the folder that contains your widget. Your filepath should end with “ArcGISExperienceBuilder\client\your-extensions\widgets”. Then, type the name of the folder containing your widget into the “Name” field. Finally, click “Create Repository”.

- Finally, click the “Publish Repository” button to publish your repository to GitHub Online.

Congratulations, your widget is now in a GitHub repository! From here, you can use GitHub Desktop to push changes you make to your repository to GitHub Online, allow friends to clone your repository so that you can both work on your widget (be careful about version control!), and, if you make your repository public, allow others to fork your repository (create their own copy) to modify and enhance your widget.
Additional GitHub Resources
If you are still wrapping your head around GitHub lingo like repo, push, pull, clone, and fork, this glossary provides definitions for those terms and many others.
If you are interested in delving deeper into Git and GitHub, including using git in the command line, this tutorial from W3Schools is a good place to start.